
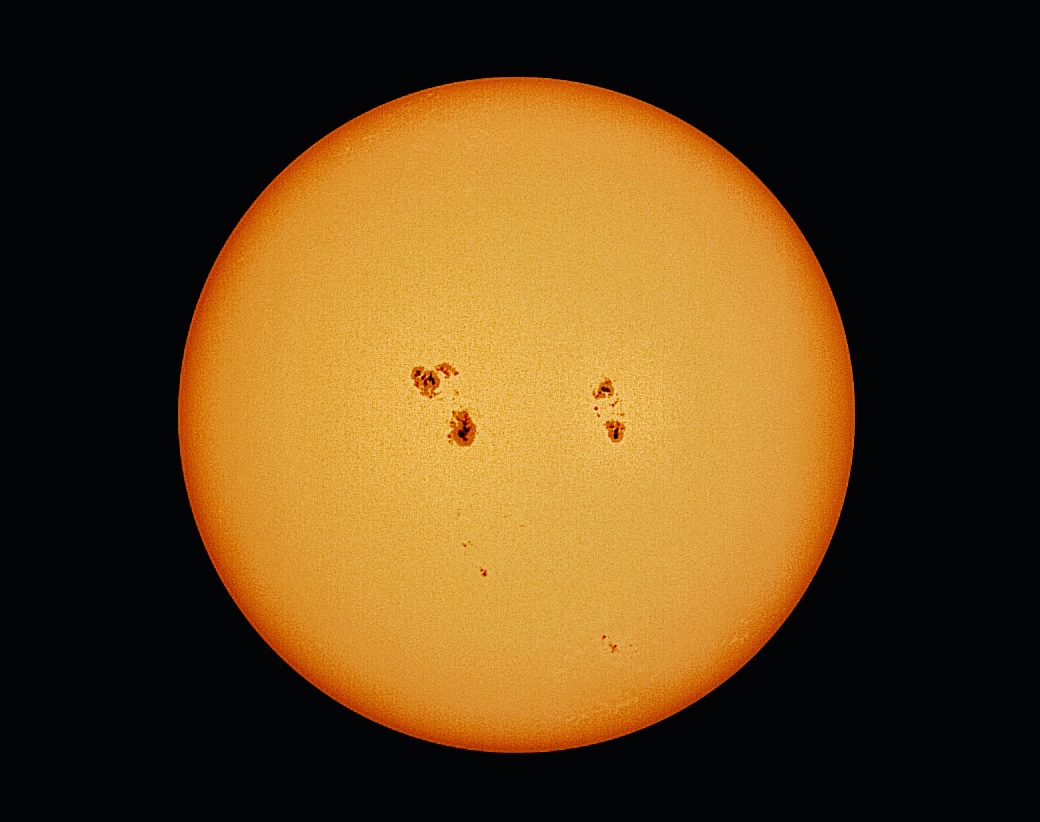
This article is a summary of my recent attempt of shooting sunspots with the Dwarf 3 smart telescope. It started like this…
At 11:55 AM the DWARF 3 reported an internal temperature of 102°F. By 12:10 PM it read 127°F. Fifteen minutes of pointing a telescope directly at the Sun in the middle of the day, and the little scope was cooking. The battery dropped from 48% to 40% in the same window, most of it spent on tracking and stacking. This is the opposite of everything else I do with this telescope. No dew heater, no Bortle 6 sky glow, no waiting until 2 AM for a nebula to clear the neighbor’s roof. The target is up all day, it is the brightest object available, and the whole problem inverts: instead of begging for photons, you are throwing almost all of them away.
The reason to do it right now is that the Sun still has plenty to show. Solar Cycle 25 peaked in late 2024 and we are in the declining phase, but declining does not mean quiet. The group I followed across five days was a proper complex: two large active regions with a string of smaller spots trailing below them, every one a knot of magnetic field bigger than Earth. And here is the part that makes solar imaging unlike anything else on this site: as I write this, that entire complex is gone. A new spot is emerging in its place. The images below are already historical documents.
What a sunspot actually is
A sunspot is not a hole and it is not debris. It is a region where the Sun’s magnetic field punches through the visible surface with enough strength to choke off convection. The photosphere normally boils. Hot plasma rises, cools, sinks, and the whole surface churns in granules the size of Texas. Where a concentrated magnetic field emerges, that circulation gets suppressed, less hot material is delivered from below, and the patch cools.
Cooler is relative. The surrounding photosphere sits around 5,500°C. The dark core of a sunspot, the umbra, runs roughly 3,500 to 4,000°C. That is still hotter than the surface of many stars. A sunspot looks black only because it sits next to something much brighter. Cut one out and hang it in the night sky by itself and it would glow orange, brighter than the full Moon.

In the stacked images you can see the two-part structure clearly. The umbra is the dark center. Around it is the penumbra, a lighter gray fringe made of filaments where the magnetic field spreads out at an angle and convection partially recovers. The big group near the center of my disk shows a classic umbra with a wide penumbral skirt. The smaller trailing spots are mostly bare umbrae, no skirt yet or already lost.
This is not the first spot group documented on this site. In December 2025 an exceptionally large group crossed the disk and I measured its physical size by pulling the stacked image into DraftSight. That session, including the measurement method and an honest accounting of what white-light imaging can and cannot show, is written up in White-Light Solar Imaging with the DWARF 3: Observing and Measuring a Large Sunspot Group. The groups this week are smaller than that one was, but the anatomy is identical.
Three sessions in five days
Spots come and go on a timescale of days to weeks, and the Sun rotates once every 27 days or so as seen from Earth, so a group takes about two weeks to march from one limb to the other. This group got three sessions across five days, and the march is right there in the images.
June 27. First contact. A single run at 1/10000s, the only exposure I tried that day.
June 29, Monday. The filter experiment, covered in its own section below. In these captures the groups sit near the center of the disk.
July 2. The full exposure bracket. Pull up that day’s full-disk view next to Monday’s and the entire complex has migrated toward the limb. Five days is roughly a third of the group’s trip across the visible disk, and that is exactly what the images show. No deep-sky target does this. M31 will look the same next week, next year, and when my kids are old. This thing rearranged itself between coffee and the weekend.
All three sessions ended the same way: the stack pulled into Snapseed and run through the identical edit. Same curves, same structure adjustment, same black point. That turns the three results into a controlled series. Anything that changed between these frames changed on the Sun, not in the processing.


And a postscript from July 7, five days after the bracket session: the complex is gone. The disk that carried five distinct groups a week ago has shed all of them, and a single new spot is emerging where they used to be. Every image in this post shows a Sun that no longer exists.
One Sun, three shutter speeds
The July 2 session was the systematic one. I shot bursts of 150 subs at gain 0 with the solar filter on, bracketing the shutter across three settings: 1/10000s, 1/1000s, and 1/500s. Same target, same filter, same gain, minutes apart, only the exposure length changed.
Gain 0 is not negotiable here. Even through the filter there is a comical amount of signal, and any gain just eats dynamic range you need for the penumbra detail.
The difference between the three settings is obvious before you even stack. At 1/10000s the live view shows a dim, muddy disk with the spot groups barely separating from the surface. At 1/500s the disk sits comfortably in the midtones and both major groups resolve down to individual umbral cores right there in the preview. 1/1000s lands in between. The app screenshots below show all three, with the shutter value visible in the bottom left corner of each.


The live view carries most of the lesson here. The edited full-disk results from each session are up in the diary section, and since every one of them went through the same Snapseed recipe, the shutter choice is doing its work upstream, in how much clean signal the stack has to start from.
If you only run one setting, run the one where the live preview shows the disk clearly but the brightest part of the surface is not blowing out. On my unit, on this day, that was 1/500s. Your filter and sky will move that number.
Three filters that were never meant for this
The Monday session, June 29, was something with no practical justification: cycling the DWARF 3’s internal filter wheel while shooting the Sun through the white-light solar filter.
The internal filters exist for night work. VIS is the plain visible-light path, Astro cuts light pollution bands, and Duo-Band isolates the hydrogen-alpha and oxygen-III lines for emission nebulae. None of them add solar detail, because the solar filter in front is broadband white-light film. What they do change is the color of the disk, and the differences are bigger than I expected. VIS at 1/10000s gave a dim brown-orange disk. Astro turned it a deep red. Duo-Band, which passes almost nothing except two narrow slices of the spectrum, needed 1/800s to expose at all and rendered the Sun a saturated magenta. A pink Sun.


To be clear about what this is not: the Duo-Band filter does not turn the DWARF 3 into a hydrogen-alpha solar telescope. You will not see prominences or surface filaments. Dedicated H-alpha scopes use etalons with passbands hundreds of times narrower. This is purely a color experiment, and the sunspots look identical in all three. Still worth ten minutes.
Processing
The DWARF 3 hands you a stacked image that is already most of the way there. My full edit happened in Snapseed on the phone: a curves adjustment to bring the disk into a warm yellow-orange, some structure and sharpening pulled back over the spot groups, and the background clipped to true black. Total time under five minutes per image, and the same recipe worked across every stack in this post. Solar work is the rare case where mobile editing is genuinely enough, because there is no faint signal to protect. Everything is signal.
The part I have to say
Never point any telescope at the Sun without a proper solar filter mounted in front of the objective. A camera ND filter does not qualify, and neither does welding glass of unknown shade or anything that mounts at the eyepiece end. The DWARF 3’s magnetic solar filter snaps over the lenses and the app will happily track the Sun once it is on. Without it you will destroy the sensor in seconds, and if an eye is anywhere in the optical path the damage is permanent. Check the filter for pinholes before every session.
The cycle is winding down. February 2026 already produced the first spotless day since 2022, and there will be more blank disks ahead as we slide toward the next minimum around 2030. The group I followed did not even wait for me to publish: it is gone, and a lone new spot is emerging on a mostly clean disk. Eventually stretches of nothing will outnumber weeks like this one. Which is its own argument for shooting the Sun this summer rather than putting it on the someday list.
If another group the size of the December 2025 monster rotates into view before the cycle fades, the DraftSight measuring workflow comes back out. Until then: filter on, gain at zero, and give the scope a break from the midday heat between runs. Clear skies.
Run Card
- Instrument: DWARF 3, Tele lens, front-mounted solar filter
- Session 1, June 27: first capture of the group, single run at 1/10000s, gain 0
- Session 2, June 29: internal filter comparison. VIS and Astro at 1/10000s, Duo-Band at 1/800s, gain 0
- Session 3, July 2: exposure bracket. VIS, gain 0, 150 subs per run at 1/10000s, 1/1000s, and 1/500s
- July 7: the complex has dissolved and a new spot is emerging
- Conditions: midday sessions, internal temperature 102°F rising to 127°F during the July 2 bracket
- Processing: onboard stacking, identical Snapseed edit across all stacks
Do I need a special filter to photograph the Sun with the DWARF 3?
Yes. A front-mounted white-light solar filter is mandatory. The DWARF 3 has a magnetic solar filter that covers both lenses. Never point the telescope at the Sun without it, and inspect the film for pinholes before each session.
What settings work for sunspots on the DWARF 3?
Start at gain 0 with the solar filter on and bracket the shutter. In my sessions 1/500s gave the best exposed disk in the live view, 1/1000s was usable, and 1/10000s was too dark for the spot detail to separate cleanly. Adjust until the disk is clearly exposed without clipping.
Why do sunspots look black?
Contrast. Sunspot umbrae are around 3,500 to 4,000°C against a 5,500°C photosphere. They emit plenty of light and would appear bright orange in isolation. Next to the surrounding surface they read as black.
How often do sunspots change?
Constantly. Individual spots evolve over days to weeks, and solar rotation carries a group across the visible disk in about two weeks. The group in this post dissolved entirely within five days of the last session, replaced by a new emerging spot.
Leave a Reply